What makes a truly great paper sunflower craft stand out from every other handmade bouquet you have tried? Simple yellow cutouts often fall flat without proper layering and texture. Adding a few brown accents or green stems elevates a basic project into a stunning centerpiece. Whether you are prepping for a summer garden party or a bright classroom bulletin board, the right technique changes everything. Grab your scissors and let us build something cheerful together.
Quick Questions and Answers
Question: What do you need to make a paper sunflower craft? Answer: Most beginner versions simply require yellow, brown, and green construction paper, sharp scissors, white glue, and a pencil for tracing. Some tutorials suggest adding a plastic straw, a bendable pipe cleaner, or a hot glue gun to secure a stem or mount the finished flower more firmly.
Question: How do you make a sunflower paper craft step by step? Answer: You typically start by cutting out yellow petal shapes and creating a textured brown center circle. Once those pieces are ready, you arrange and glue the petals around the middle section. Finally, you attach green leaves and a stem to complete the assembly and allow everything to dry completely.
Question: Can kids make a paper sunflower safely? Answer: Yes, simple tutorials work perfectly for children when adults manage the sharp tools and adhesive guns. Guides from creators like Mum in the Madhouse design these projects specifically for families, using safe paper glues and easy hand-cutting methods that keep little fingers secure throughout the creative process.
Key Takeaways
- Batch cutting petals ensures uniform shape and saves significant time during assembly.
- A textured center replaces boring flat circles and instantly boosts realism.
- Proper drying time prevents warped layers and keeps the final piece stiff.
- Adult supervision remains essential whenever we handle wire cutters or hot melt adhesive.
What You Need
| Item | Purpose | Notes |
|---|---|---|
| Yellow construction paper | Forms the visible petals | Standard 9×12 inch sheets work best for beginners |
| Brown cardstock | Creates the seed head base | Heavier weight holds up better against heavy glue |
| Green crepe or tissue paper | Adds leaf detail and flexibility | Stretch slightly when folding to mimic natural veins |
| Scissors | Cuts paper shapes accurately | Blunt blades suit young makers; sharp blades suit pros |
| White school glue | Bonds lightweight paper layers | Dries clear and gives a few seconds for repositioning |
| Hot glue gun | Secures heavy cardstock or structural supports | Requires adult oversight; sets bonds within ten seconds |
| Plastic or wooden dowel | Acts as a sturdy plant stalk | Paint it green or wrap with floral tape beforehand |
| Ruler and pencil | Marks straight cutting lines and spacing | Helps maintain consistent petal dimensions across batches |
Step 1: Measure and Cut Your Petals
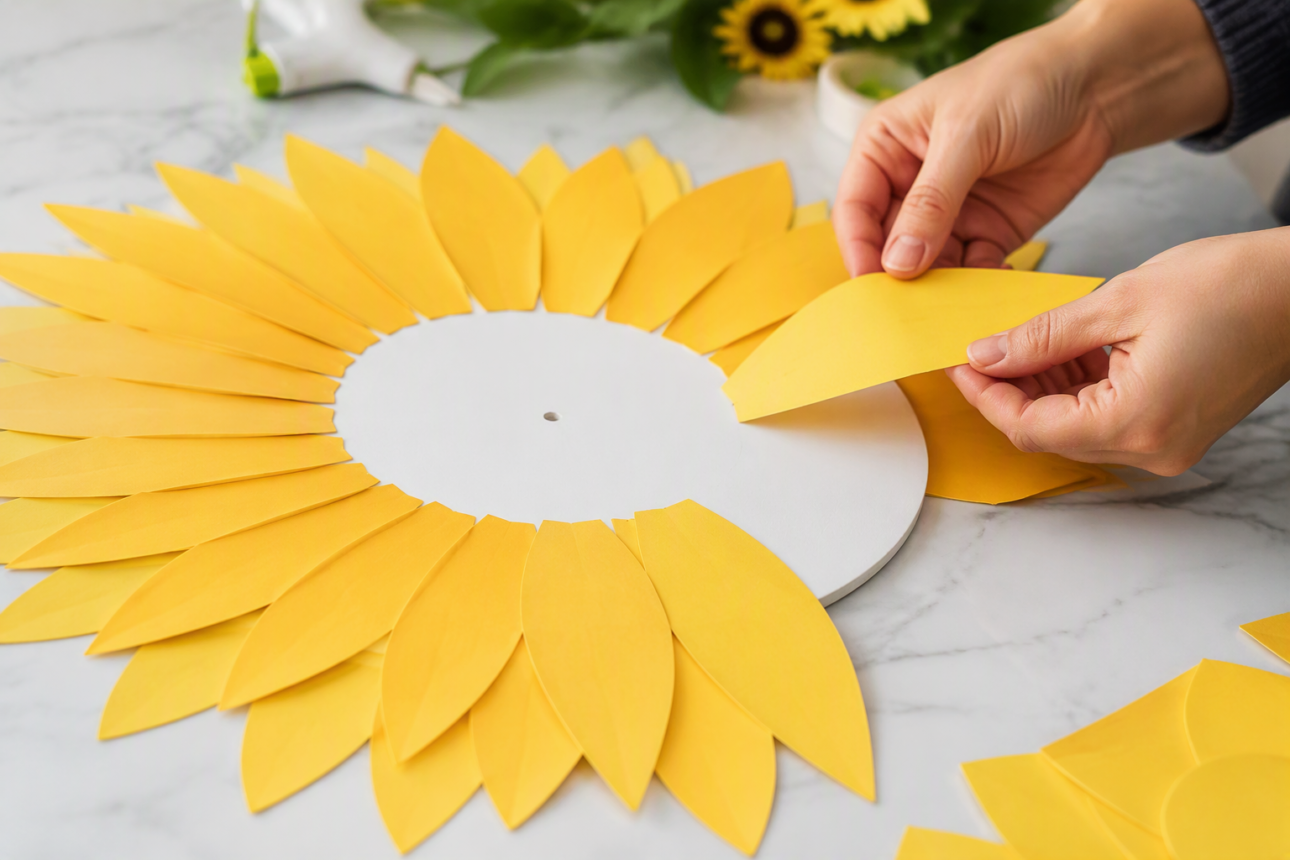
Start by laying your yellow paper flat on a clean workspace. Use a ruler to mark rectangles measuring four inches by eight inches. These dimensions give the petals enough length to curve outward without looking cramped. Trace three to four rectangles per sheet depending on your desired bloom size. Sharp scissors glide through standard construction paper without jagged edges. Cut along the marked lines steadily.
If you plan to build a larger display piece, switch to heavier cardstock. Jennifer Maker recommends cutting forty individual petals for a showstopper bloom. She advises grouping your work into batches of five to maintain consistency. Working in small groups keeps your focus sharp. You will notice fewer crooked edges when you reset your grip between cuts.
For the smallest family projects, freehand cutting works fine. Just keep the curves gentle and rounded at the top. Flat triangle tips look artificial. Round tips catch the light properly and mimic actual botanical forms. Stack your cut petals in neat piles as you finish each batch. This habit prevents mixing sizes later. Success looks like a tidy stack of identical yellow shapes ready for shaping.
Step 2: Form the Textured Seed Center
A flat brown circle kills the whole illusion. Real sunflower heads hold deep ridges and scattered seeds. We solve this by building a textured ball or disc first. Grab two sheets of brown cardstock. Cut four pieces from each sheet to get eight total segments. Fold each segment in half lengthwise to create a crease. Unfold them and press the centers inward so the pieces cup slightly.
Now we add the coffee ground trick. Crafting Step by Step swears by this method for instant realism. Coat a crumpled scrap of paper in a thin layer of glue. Roll it gently in used coffee grounds until the surface feels rough. Press the textured ball onto your glued center backing for ten to fifteen seconds. Let the entire piece sit undisturbed for an hour. The bond hardens fully. You will hear a faint tap when it is ready to move. That solid thud means your center will support heavy petals without sagging.
Skip the coffee grounds if you lack time. Woven paper strips work just as well. Thread alternating black and dark brown strips horizontally and vertically across a brown circle. Snip the loose ends flush. The intersecting pattern mimics seed arrangements cleanly. Both methods beat plain colored dots. Pick whichever fits your schedule. Then set your center aside to cool or dry completely before moving forward.
Step 3: Fold and Shape Each Layer
Flat paper refuses to pop. Curved paper catches shadows and reads as three dimensional. We fix this with simple folds. Grab your first batch of yellow petals. Run your thumb firmly along the center line of each piece to create a valley fold. Open the petal slightly and pinch the base downward. This gives the bloom natural movement. Hold each shaped petal for a moment. The crease memory locks in quickly on standard construction paper.
Heavier cardstock fights back harder. It snaps back to flat unless you score it first. Place a dull butter knife or empty ballpoint pen along the petal spine. Press down gently to compress the fibers without slicing through. Flip the paper and repeat on the opposite side. The resulting hinge bends smoothly every time. You will feel less resistance and gain much tighter control.
Compare your options before buying extra gear. Paper weight and fold technique change the final stiffness dramatically. Different materials demand different handling approaches.
| Material Type | Fold Behavior | Best Tool | Drying Time |
|---|---|---|---|
| Light construction paper | Bends easily but springs back | Fingernail scoring | 20 minutes |
| Heavy cardstock | Resists bending initially | Bone folder or dull knife | 45 minutes |
| Tissue paper | Wrinkles if pressed too hard | Soft brush application | 10 minutes |
| Crepe paper | Stretches naturally with heat | Hair dryer on low | Immediate use |
Fold your petals in small rounds. Shape twenty at a time. Stop before your hands fatigue. Fatigued thumbs create uneven curves. Even spacing between folded angles keeps the bloom balanced. Lay your shaped petals face down on wax paper. Do not stack them yet. Airflow prevents accidental sticking. You should see a gentle U-shape across every piece. That consistent arc signals readiness for gluing.
Step 4: Build the Base Support Structure
Large blooms collapse without internal framing. Thin glue joints crack under the weight of layered petals. We reinforce the backside early to save hours of rewarming frustration. Cut a twelve by twelve inch square of foam core. This rigid panel absorbs impact and keeps standing flowers upright. Trace your brown center circle onto the foam using a pencil. Cut inside the line carefully. You want a perfect circular platform that matches your front decorative cover.
Apply spray adhesive evenly across the foam disc. Stand in a ventilated room. Spray away from your face. Work in smooth side-to-side passes. Let the tackiness activate for thirty seconds. Press your brown cardstock center firmly onto the sprayed surface. Burnish the edges with a clean cloth. Smooth air bubbles toward the outer rim. A tight seal prevents peeling during transport or display handling.
Jennifer Maker suggests wiring a hanging option directly into this base. She threads a twenty inch strand of 22 gauge floral wire through the foam center before attaching the decorative cover. Twist the wire ends securely behind the foam. Leave a generous loop for mounting hooks. Test the tension by lifting the base gently. It should hang level without tilting. Secure stability here saves your petals from gravity later. Set the backed base on a flat tray. Move to the next phase once the adhesive cures fully.
Step 5: Glue Petals Around the Center
Layering decides whether your craft looks homemade or professional. Overlapping creates depth. Gaps expose the backing and ruin the illusion. Start with the innermost ring. Apply a thin bead of glue to the underside base of your first petal. Press the wide edge against the outer rim of your textured center. Space the base evenly around the circle. Five petals fit comfortably in that first row.
Push outward gradually. The second row shifts slightly forward. Place each petal midpoint against the seam of two inner petals. This staggered pattern mimics natural botanical growth. Apply glue sparingly. Too much adhesive bleeds through thin paper and creates stiff white spots. Wipe excess immediately with a damp cotton pad. Work clockwise around the bloom. Rotate your workspace instead of reaching across to maintain steady pressure.
Hot glue speeds production but demands caution. Load the gun with medium temperature sticks. Squeeze triggers slowly. A single drop covers two petal bases adequately. Press each petal into place and count to three. Heat bonds lock fast. Let the flower rest undisturbed between rows. Structural integrity builds layer by layer. You will notice the bloom gaining volume. The center stays hidden. Petals fan outward cleanly. That even radial spread marks successful assembly. Pause when you reach fourteen to sixteen petals total. Stop before the shape flattens into a plate.
Step 6: Attach Leaves and Secure the Stem
Leaves ground the flower visually. Without them the bloom floats awkwardly. Cut two elongated teardrop shapes from green paper. Trim shallow zigzags along the sides for realistic margin detail. Fold each leaf in half lengthwise. Run your thumbnail down the fold to create a spine ridge. Unfold and curl the edges backward gently. This reverse curve tricks the eye into reading depth.
Position the stems behind the foam backing. Align the center hole over the flower bottom. Slide the stem upward until it meets the glued seam. Apply a generous ring of hot glue around the junction. Press the foam disc firmly against the stem collar. Hold the connection still for fifteen seconds. Weight distribution shifts upward once released. The stem carries the full bloom now.
Wrap green floral tape around the joint in a spiral pattern. Pull the tape taut as you wind. Tape shrinks slightly when stretched and seals gaps automatically. Cover the metal or wood shaft entirely. Trim excess tape with scissors. Shake the assembled piece lightly. Listen for shifting parts. Silence means everything bonded securely. Lay the finished sunflower face down on parchment paper. Allow the final adhesive cure to complete for sixty minutes. Handle only by the stem afterward. Success shows a stable, upright plant ready for display or gifting.
Tips
- Keep a spray bottle of water nearby to mist stiff paper fibers before folding. Moisture relaxes cellulose bonds temporarily and reduces cracking.
- Store unused petals in a flat file box. Gravity warps stacked paper over weeks. Flat storage preserves crisp edges until you need them.
- Paint the base of your stem dark brown to match earth tones. Color continuity hides tape seams and grounds the whole composition naturally.
- Test glue strength on scrap paper first. Different brands react differently to porous surfaces. Minor adjustments prevent disaster on your main piece.
- Rotate your work surface every few minutes. Standing in one spot strains your shoulders and introduces inconsistent angles. Comfort keeps your lines straight.
FAQ
Q: Why does my paper sunflower look flat or messy?
Flat results usually come from petals that lack deliberate folds or layered overlap. Messy edges appear when cutting happens too quickly or glue spreads unchecked. Several tutorials improve realism by concertina-folding petals, shaping them in batches, or using a textured center instead of a plain circle. Focus on slow trimming and controlled adhesive placement to fix both issues quickly.
Q: How long does a paper sunflower craft take?
Small kid-friendly versions can be finished fairly quickly because they use only a few paper parts and simple glue. One tutorial explicitly says to hold the center for 10 to 15 seconds and let the whole flower dry for an hour, while giant versions take longer because they involve many cut pieces and layered construction. Plan extra drying time if you stack multiple blooms back to back.
Q: Do you need a template for sunflower paper craft DIY?
Not always. Leap of Faith Crafting says you do not even need a free template, while other tutorials provide or recommend templates for more consistent petal shapes and faster cutting. Freehand drawing works fine for round petals, but traced guides help beginners maintain uniform sizing across all forty pieces. Choose whichever method matches your skill level.
Q: What paper is best for making paper sunflowers?
Construction paper, cardstock, craft paper, and even tissue paper are all used in the tutorials, but sturdier paper is preferred when the flower needs to hold shape. Jennifer Maker uses 65 lb. cardstock for a large sunflower, while smaller craft guides often use ordinary colored paper. Heavier weights resist curling and carry adhesive weight without tearing during assembly.
Q: How do you make the sunflower center look realistic?
Some tutorials use a black paper circle with woven strips to mimic seeds, while others use a textured ball covered with used coffee grounds for a more natural look. The coffee-ground version is especially effective when you want a sunflower that looks less like a generic yellow flower. Rough surfaces catch ambient light and break up the flat shine of dyed paper.
Q: What are the common mistakes in paper sunflower crafts?
Common problems include cutting petals in inconsistent sizes, skipping dry time, using too little adhesive, or making the center too weak to support the petals. Large-format tutorials also show that batch work and careful layering matter because the structure can sag if the center or backing is not strong enough. Review each bonding point before adding the next row.
Q: Which sunflower paper craft is easiest for beginners?
The easiest options are the kid-friendly and no-template tutorials that use basic colored paper, scissors, and glue. A Visual Merriment and Leap of Faith Crafting both present simple projects that avoid machine cutting and can be adapted quickly for home or classroom use. Start with three rectangle cuts and a single textured disc to build confidence before scaling up.
My Experience With How to Make Sunflower Paper Crafts Step by Step
I ruined my first three attempts by slathering glue everywhere. Paper absorbed the moisture, turned limp, and refused to hold its folded shape. Switching to a light spray adhesive changed the entire workflow. I also learned to stop fighting the cardboard. Scoring the spine instead of forcing it saved my knuckles. The coffee ground center looked surprisingly lifelike once I let it cure. I rushed that step once and watched the whole head droop sideways. Never hurry the drying phase. You will thank yourself later. Try batching your folds before committing to glue. It takes the guesswork out of symmetry. Which step trips you up most when you are juggling multiple paper types at once?
Conclusion
Paper sunflowers reward patience and simple hand movements. Follow the measured cuts, respect the drying windows, and layer petals deliberately. Your finished piece will stand tall and catch light beautifully. Keep your workspace organized and your tools sharp. The craft stays forgiving as long as you protect the adhesive bonds during curing. Share your blooms with friends or display them where morning sun hits hardest. Happy crafting.
References
- Mum in the Madhouse. (n.d.). Paper sunflower craft for kids – easy and fun DIY tutorial. Mum in the Madhouse. https://www.muminthemadhouse.com/paper-sunflower-craft/
- Jennifer Maker. (2026). Giant paper sunflower tutorial – this will mesmerize you! Jennifer Maker. https://jennifermaker.com/giant-paper-sunflower-tutorial-mesmerize/
- YouTube Creator. (2026). DIY giant paper sunflower how to make a backdrop, giant standing paper flower. YouTube. https://www.youtube.com/watch?v=BL4Am8fjiNw
- A Visual Merriment. (n.d.). How to make a cute sunflower paper craft. A Visual Merriment. https://www.avisualmerriment.com/sunflower-paper-craft/
- Leap of Faith Crafting. (n.d.). How to make paper sunflowers tutorial: easy DIY. Leap of Faith Crafting. https://leapoffaithcrafting.com/make-paper-sunflowers/
- Crafting Step by Step. (n.d.). How to make a paper sunflower (easy 8-step tutorial). Crafting Step by Step. https://www.craftingstepbystep.com/paper-crafts/how-to-make-a-paper-sunflower
- Moms and Crafters. (n.d.). DIY paper sunflower templates. Moms and Crafters. https://www.momsandcrafters.com/diy-paper-sunflower-templates/

Sarah Anderson . J
I’m the mom behind Wise Mom Blogger, where everyday creativity meets real-life motherhood. I share easy DIY crafts, cozy knitting and crochet projects, beginner-friendly sewing ideas, and family-tested recipes—plus quick baking hacks that make homemade feel doable on busy days.