What transforms a blank wall into something people actually notice? Board and batten does exactly that—adding instant depth and architectural character to any room without requiring a full renovation. Whether you’re drawn to the farmhouse charm of a half-wall ledge or the modern edge of geometric patterns, board and batten works across different styles and room types. The best part is it’s approachable for DIY and adapts to tight budgets. Let’s explore the ideas that work, the spacing that matters, and how to pull this off room by room.
Quick Questions and Answers
Question: What is a board and batten wall?
A board and batten wall is a wall treatment that uses wider boards as the base surface and narrower battens to cover the seams or create a decorative pattern. The style began as exterior siding, but interior designers now use it to add depth and visual interest inside homes.
Question: How do you plan board and batten spacing?
A common DIY spacing range is 12 to 20 inches between battens. Home Depot also recommends keeping spacing consistent and determining panel size before cutting so the finished layout looks balanced across the wall.
Question: Can board and batten work in small rooms?
Yes, but the layout matters. Vertical battens can make a room feel more expansive, while a half-wall or lower-profile design adds texture without visually crowding the space.
1. Classic Half-Wall Ledge
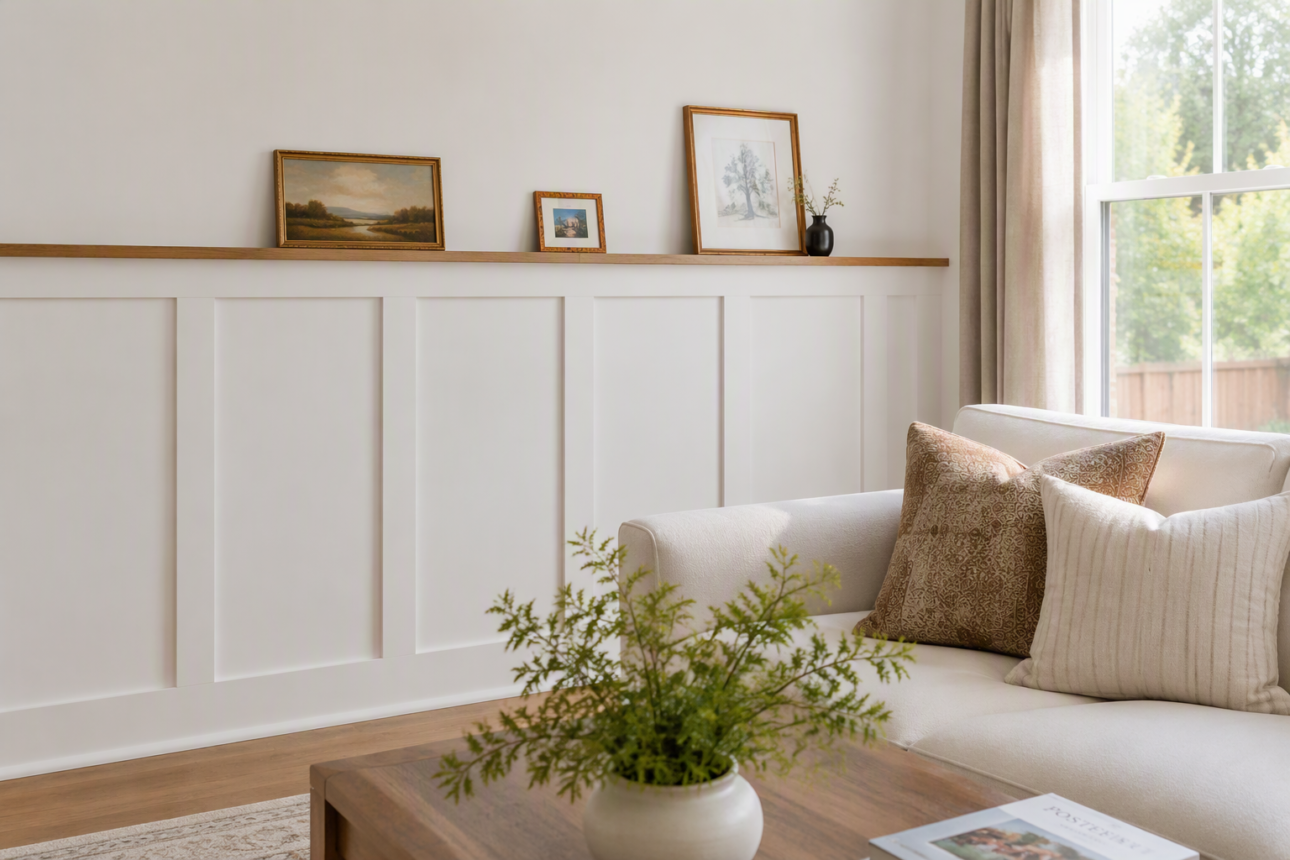
A half-wall board and batten treatment stops roughly 36 to 48 inches up the wall, creating a natural visual break that grounds the room without overwhelming it. The top is finished with a horizontal ledge board—usually a 1×2—that serves double duty: it looks polished and gives you space to rest decor, a plant, or a framed photo. Below, baseboard trim completes the look and adds traditional detail.
This approach works beautifully in living rooms, bedrooms, and dining areas where you want texture without committing the whole wall to battens. It’s also one of the most forgiving options if you’re new to the technique because the lower height makes installation easier and mistakes less noticeable. The ledge itself is functional—people actually use it—which gives the treatment a practical purpose beyond aesthetics.
The paint strategy here matters. Most half-walls look cleanest when the lower board-and-batten section and the upper wall are the same color, letting shadow play do the visual work. But if you want more drama, paint the lower portion a darker tone to anchor the room and keep the upper wall light. This creates clear separation without feeling disjointed.
2. Expansive Vertical Wall-to-Wall
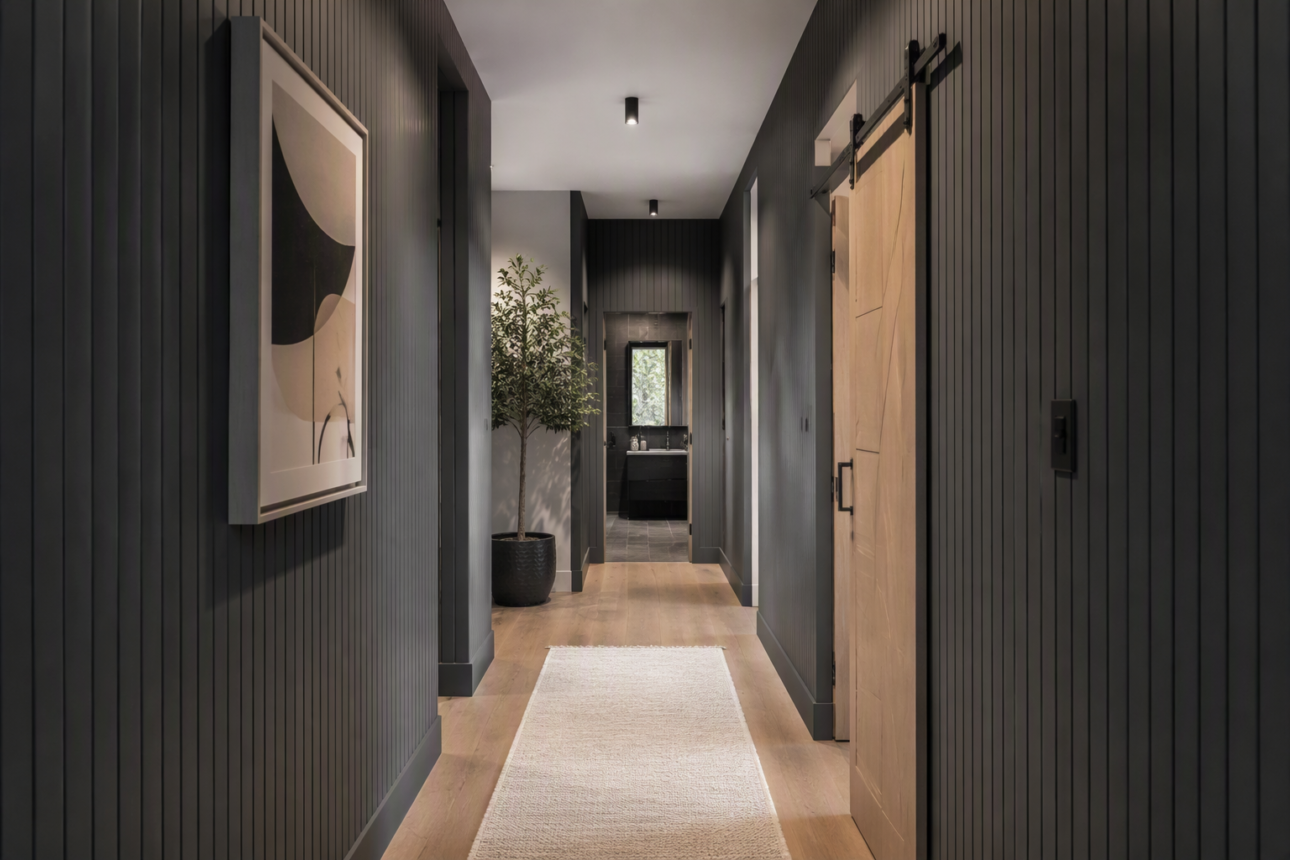
Take vertical battens from floor to ceiling, spaced evenly across the entire width of a wall, and suddenly a room feels taller. This is the strategy design pros reach for when they need to visually stretch a narrow entryway or add height to a hallway that feels cramped. The eye follows the vertical lines upward, and that optical trick actually works.
Wall-to-wall battens require more material and more installation time, but the payoff is dramatic. According to The Spruce, adding vertical batten boards wall-to-wall all around a space creates an expansive feel that can completely reshape how a room reads. The spacing stays consistent—12 to 20 inches is standard—but because you’re covering more square footage, the rhythm becomes even more important. Uneven spacing looks sloppy fast.
This treatment pairs well with cool whites or soft grays that don’t fight the visual texture. You can also go monochromatic (painting everything one color) to let the battens’ shadows provide all the visual interest. The key is restraint—let the geometry do the work rather than layering in competing colors or patterns. Nurseries, staircases, and narrow corridors are ideal homes for this approach.
3. Subtle Plaid Pattern
Instead of running battens only vertically, overlay horizontal boards at regular intervals to create a grid or plaid effect. The beauty of this variation is that it doesn’t require contrasting paint colors to succeed. Paint everything the same soft shade, and the shadows cast by the intersecting boards create a sophisticated, textile-like finish that reads as intentional rather than chaotic.
Hovel Sweet Hovel features examples of plaid-pattern board and batten, and the post notes that this approach needs no contrasting paint, which makes it a lower-commitment visual treatment than designs requiring dual colors. The pattern itself provides enough visual interest. This is a smart move if you’re hesitant about color commitment or painting multiple times.
Spacing matters here because the rhythm of the grid becomes the focal point. If vertical battens are 16 inches apart and horizontal ones are 18 inches apart, the proportions stay balanced without feeling forced. Bedrooms and studies benefit most from this quieter approach—it adds character without demanding attention every time you enter the room.
4. Sophisticated Double-Batten Dining Feature
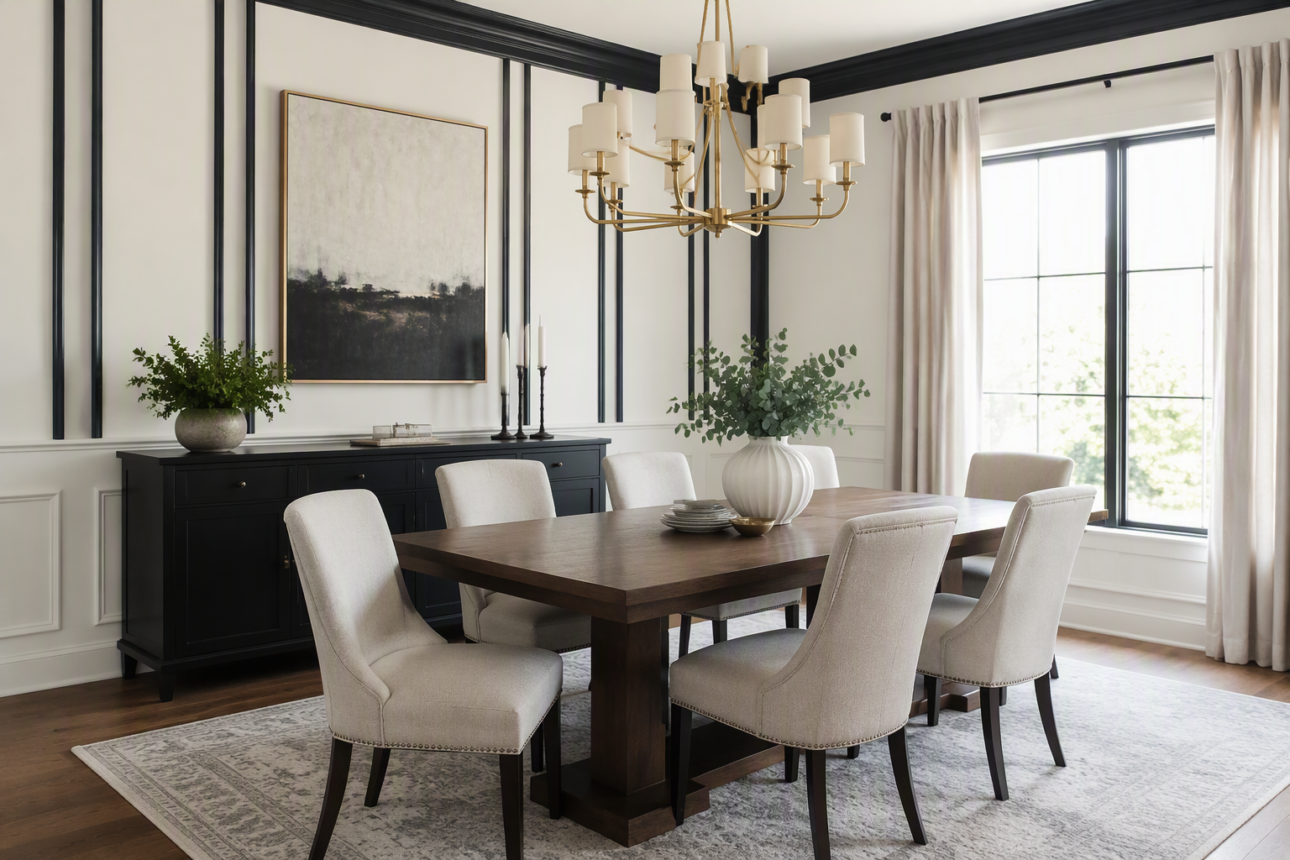
Pair two vertical boards close together instead of installing single battens, and you shift from subtle texture to a formal architectural statement. The double-batten approach creates a heavier visual rhythm that pulls focus naturally, making it ideal as a dining room focal point or in formal spaces where the wall itself is meant to anchor the room.
Hovel Sweet Hovel shows a dining room example using the double-batten technique with contrasting paint to emphasize the paired boards. The darker paint on the battens against a lighter wall creates sharp definition—the effect is formal and intentional. This works beautifully behind a dining table where people will spend time looking at the wall. The rhythm of paired boards has a classic, almost wainscoting-like sophistication.
Installation-wise, double battens are just a slight variation on standard spacing—you simply place battens in pairs with 2 to 4 inches between them, then leave a wider gap (12 to 16 inches) before the next pair begins. The visual weight this creates is significant, so reserve it for rooms with enough wall space to carry it and enough design confidence to commit to the look.
5. Functional Mudroom Hook System
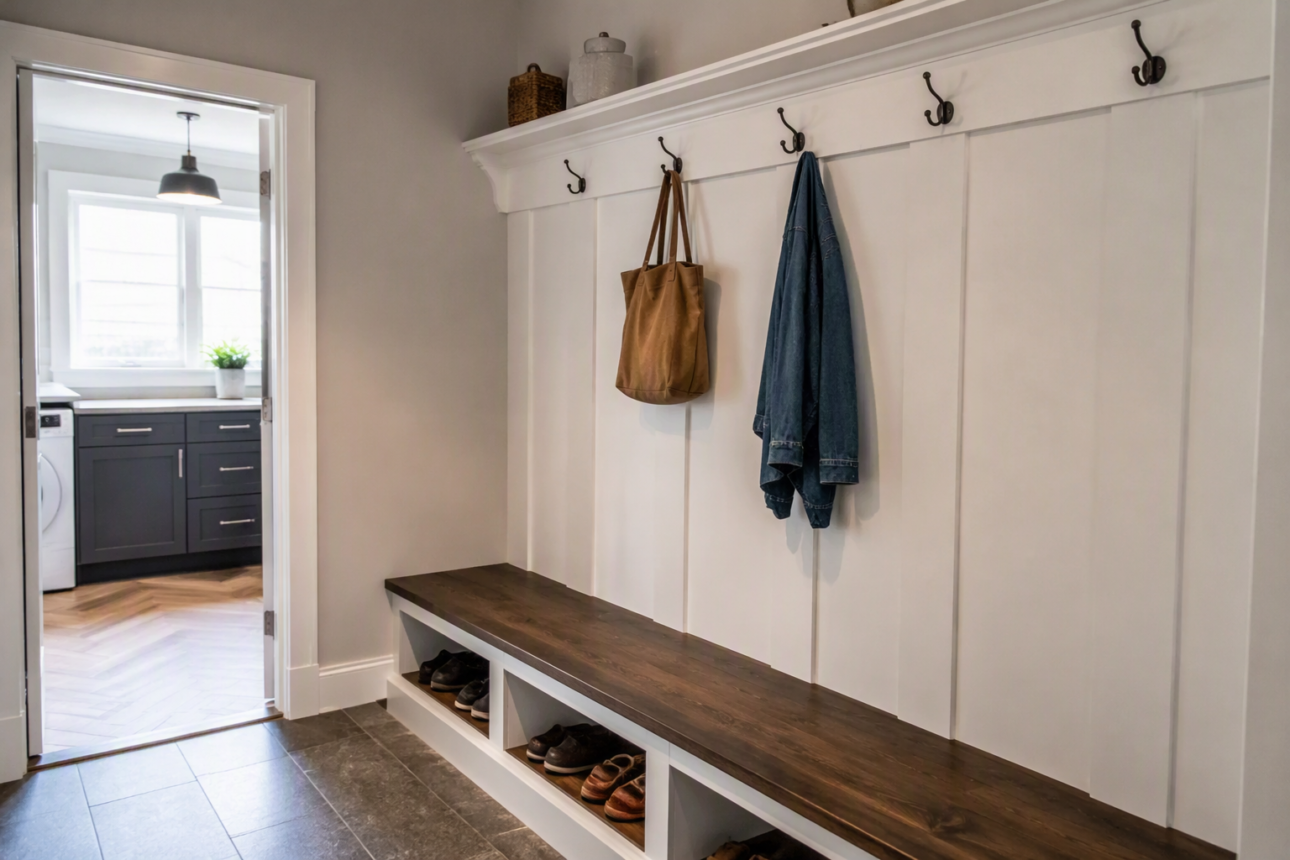
Combine board and batten with practical hardware by adding a sturdy top ledge board designed to support heavy-duty hooks. This transforms the treatment from purely decorative into a working storage solution—coats hang neatly, keys have a landing spot, and the wall becomes an organized command center rather than just pretty.
The structural piece here is crucial: those hooks will carry real weight, so you need to secure battens into wall studs or blocking behind the drywall. Skipping this step is how mudroom projects fail. Hovel Sweet Hovel highlights functional mudroom board and batten versions that integrate hooks and shelving, showing that the treatment doesn’t have to be one or the other—it can be both beautiful and useful.
A 1×2 ledge board running horizontally at about 60 to 66 inches from the floor gives hook hangers room to work while keeping the system within arm’s reach. Paint it a coordinating color or make it pop with contrast—either way, people will appreciate that the aesthetic doesn’t sacrifice function.
6. Modern Geometric Layout
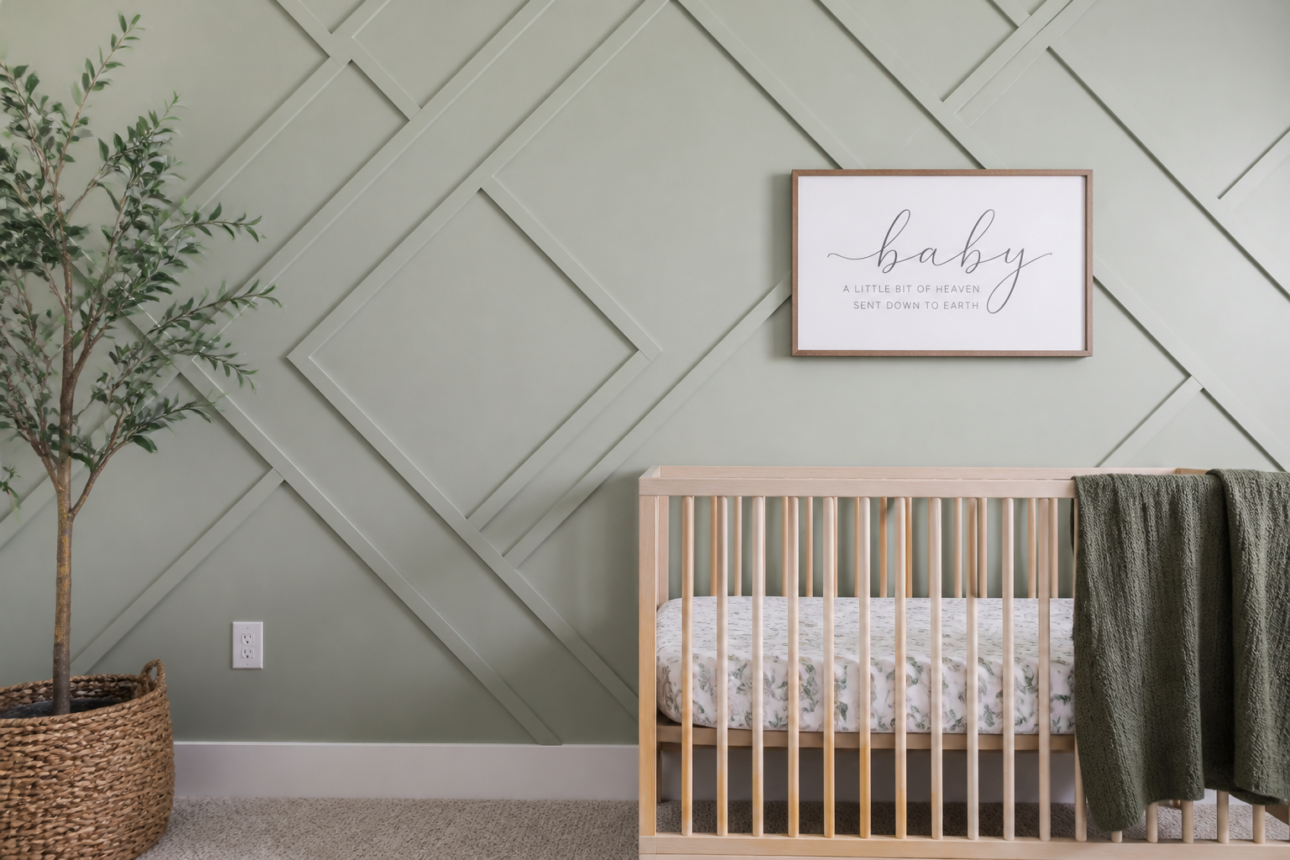
Move away from evenly spaced vertical battens to create diagonal lines, chevron patterns, or custom intersecting shapes. This approach appeals to homeowners who want board and batten’s textural benefit without the traditional, predictable feel. Geometric layouts are architectural statements that read as intentional design rather than classic trim work.
The visual impact depends on complexity. A simple diagonal from corner to corner feels bold but approachable. Intricate chevrons or hexagonal patterns demand precision in layout and cutting but deliver a contemporary gallery-wall vibe. Modern nurseries, creative workspaces, and high-design living areas are natural fits. The technique requires more planning—sketch the pattern, measure twice, verify the math before you cut a single board.
Paint strategy shifts here too. Monochromatic geometric board and batten can work, but many designers choose contrasting colors to let the shape really read. A white geometric pattern on a soft gray or black geometric lines on white create visual punch. Reserve this for walls where the pattern is the main event, not competing with a busy room layout.
7. Traditional Tall Picture-Frame Molding
Install battens in rectangular, frame-like sections to mimic period-appropriate wainscoting. This treatment focuses on vertical symmetry and heritage-inspired detail, typically running 48 to 54 inches high. Each “frame” is a defined rectangle formed by horizontal and vertical battens, creating multiple focal points rather than one continuous pattern.
The Spruce highlights tall picture-frame style moldings as effective in bedrooms where an elegant, high-end look is desired. The technique combines battens with traditional molding profiles to create a look that feels architectural and custom. This approach requires precise measurement and layout because every frame needs to be proportional—misaligned rectangles look amateurish fast.
Paint both the boards and the wall behind them in complementary tones, or go monochromatic for a subtle, sophisticated effect. The rectangles themselves provide the visual interest, so let them do their job. Bedrooms, formal studies, and traditional living rooms are ideal spaces for this treatment.
8. Essential DIY Standard 1×4 Setup
The most popular DIY configuration uses 1×4 lumber for vertical battens and a 1×2 for the top ledge, according to Angela Marie Made’s step-by-step guide. Brad nails measuring 1 1/4 inches placed approximately every 10 inches secure everything flush to the wall, and the spacing between battens typically falls in that 12 to 20-inch range depending on your wall width and desired density.
The finishing work separates polished installations from unfinished ones. Fill brad nail holes with lightweight spackle, sand smooth, caulk all side seams where battens meet the wall, then prime and paint. Most surfaces need two coats of quality paint to achieve even coverage. Home Depot recommends this exact setup for DIY accent walls, and the approach works for beginners because the materials are standard and forgiving.
This configuration strikes a balance—the 1×4 battens are substantial enough to cast real shadows and provide visual weight, but not so chunky that they overwhelm residential spaces. The 1×2 ledge reads as intentional trim rather than an afterthought. If you’re building board and batten for the first time, this is the setup to follow.
9. Monochromatic Texture Treatment
Paint battens and wall the identical color and finish. Shadows cast by the battens become the entire design—no color contrast, no competing tones, just depth and light play. This approach delivers a high-end, seamless look that works especially well in small or dimly lit rooms where contrasting colors might feel choppy or dated.
Monochromatic board and batten requires confidence because the texture becomes everything. Choose a matte or eggshell finish so shadows read cleanly, and make sure your wall is smooth and well-prepped—imperfections will show against flat color. The technique works across any color choice—soft whites, warm grays, even soft greens or blues. The color matters less than the finish uniformity.
This treatment is perfect for bedrooms, bathrooms, and hallways where you want sophistication without drama. It’s also a gateway technique for people hesitant about full board and batten commitment—the subtlety feels less permanent psychologically, even though the installation is identical to any other version.
10. High-Contrast Color Split
Paint battens in one color and the wall in a dramatically different shade to emphasize every line and make the treatment a bold focal point. Dark battens on light walls or bright battens on dark walls create sharp definition that reads from across the room. This approach is uncompromising—you’re making a statement, not whispering a suggestion.
High-contrast works beautifully in dining rooms where the feature wall will be a natural gathering point, or in bedrooms where you want strong personality. The technique lets you play with color confidence because the battens frame each decision visually. A crisp white batten against a deep charcoal wall feels modern. Navy battens on soft cream feels coastal. The possibilities shift completely based on your color choices.
Installation is the same regardless of color, but the visual impact is entirely different. With high-contrast, precise spacing and clean nail work become even more important because imperfections read loudly against competing tones. Take extra time on prep work and finishing to earn the visual weight you’re creating.
Comparison Table: Board and Batten Options at a Glance
Style
Best For
Installation Difficulty
Visual Impact
Paint Strategy
Half-Wall Ledge
Living rooms, bedrooms
Easy
Moderate
Monochromatic or split
Wall-to-Wall Vertical
Entryways, hallways
Moderate
High (expansive feel)
Monochromatic preferred
Plaid Pattern
Studies, bedrooms
Moderate
Subtle
Monochromatic works best
Double-Batten
Dining rooms, formal spaces
Moderate
High (architectural)
Contrasting colors shine
Mudroom Hooks
Entryways, mud rooms
Moderate to Hard
Moderate + functional
Any that suits your home
Geometric Layout
Modern spaces, nurseries
Hard
Very High
Monochromatic or contrast
Picture-Frame
Bedrooms, formal studies
Hard
Very High (elegant)
Monochromatic or subtle
Standard 1×4 Setup
Any room (foundational)
Easy to Moderate
Moderate
Any choice works
Monochromatic
Small/dim rooms
Easy to Moderate
Subtle/elegant
Single color, all surfaces
High-Contrast Split
Dining, accent walls
Easy to Moderate
Very High
Two bold colors
Common Mistakes
Ignoring wall stud placement. Battens need to hit studs or blocking every 16 inches or so to hold securely. Using adhesive alone, especially on older drywall, invites future problems. Find studs with a stud finder before you start nailing.
Spacing inconsistency. Eyeballing batten spacing instead of measuring leads to layouts that look off even if you can’t articulate why. Mark batten positions on the wall with pencil before picking up a tool. That 2-inch variation in spacing reads as sloppy from 10 feet away.
Skipping the ledge trim. A simple 1×2 ledge at the top transforms the look from DIY hack to designed feature. It also conceals the seam where battens meet the wall, solving a visual problem. Don’t skip it thinking you’ll save time—you won’t.
Using construction-grade wood without prep. Cheap lumber warps, and warped battens look terrible. Invest in better-grade boards or allow time for materials to acclimate to your home’s humidity before installation.
Insufficient filling and caulking. Brad nail holes left open, unsealed seams, and rough caulk lines are the difference between professional and amateur finishes. Lightweight spackle, fine-grit sandpaper, and caulk applied with a wet finger take extra time but pay visual dividends.
Choosing the wrong height for half-walls. 36 inches feels skimpy in high-ceilinged rooms; 54 inches can feel heavy in modest spaces. Sketch it out or use painter’s tape to mark the proposed height before committing to cuts.
FAQ
Q: Which rooms are best for board and batten walls?
Roundups show board and batten appearing in bedrooms, living rooms, dining rooms, kitchens, entryways, bathrooms, nurseries, mudrooms, and staircases. That means it works well anywhere you want either a focal wall or a durable decorative finish. The key is matching the style to the room’s purpose—formal dining deserves different treatment than a playroom. Most homes benefit from starting with one accent wall rather than committing to an entire room.
Q: Do board and batten walls need to be painted?
Most DIY examples finish with paint after filling nail holes and caulking seams. Paint unifies boards and battens visually, though some patterned versions rely more on the wood layout than on strong color contrast. Unfinished wood can work in rustic or cabin-style spaces, but you’ll still want to seal it to prevent moisture damage and dust accumulation. Two coats of quality paint is standard for professional results.
Q: How hard is it to install board and batten?
The basic version is manageable if you can measure accurately, cut boards, and use a level, brad nailer, adhesive, caulk, and spackle. More complex patterns demand careful layout and precise cutting. A simple half-wall or standard vertical setup is genuinely beginner-friendly. Geometric patterns or picture-frame molding require advanced skills and planning.
Q: What materials are commonly used for board and batten?
Common DIY materials include 1×4 boards for battens, a 1×2 top ledge board, construction adhesive, 1 1/4-inch brad nails, spackle, caulk, primer, and paint. Quality matters—better lumber resists warping, adhesive designed for trim bonds more reliably, and premium paint provides better coverage. Budget roughly $3 to $8 per linear foot of wall depending on material choices and finishes.
Q: Why choose vertical over horizontal battens?
Vertical battens make walls feel taller and rooms more expansive by drawing the eye upward. Horizontal or mixed layouts read more traditional or decorative, depending on spacing and room proportions. Diagonal or geometric arrangements add contemporary energy. Your room’s ceiling height, natural light, and design goals should guide this choice.
Q: What makes a board and batten wall look high end?
Clean spacing, crisp caulk lines, a well-chosen top ledge, and thoughtful paint color make the biggest difference. Customized examples also use contrasting color, geometric layouts, or added trim to feel architectural. The detail work—sanding, filling, caulking—separates polished finishes from rough ones. Unrushed installation shows.
Q: Is board and batten good for an entryway?
Yes, strongly. The treatment adds structure and can support practical features like hooks or a ledge for keys and decor. That makes it a strong choice for a high-traffic first-impression space. Wall-to-wall vertical battens in an entryway create an expansive, gallery-like feeling that welcomes people into your home.
My Experience With 10 Brilliant Board and Batten Wall Ideas for Every Budget
I’ve installed board and batten in three different rooms, and the learning curve is real but totally worth it. The first one was humbling—my spacing drifted slightly as I moved across the wall, and I spent an afternoon filling every nail hole and caulk line. By the third wall, I’d learned that painter’s tape marks save hours of grief and that a brad nailer beats a hammer by a landslide for quality finishes.
The monochromatic approach surprised me. I expected it to look boring without color contrast, but the shadows from the battens create this subtle, expensive-looking texture that actually photographs better than high-contrast versions. It’s also forgiving—imperfect caulk lines disappear when everything’s the same color. That said, the half-wall ledge with a contrasting top board still feels like the smartest move for most people. It’s visually interesting, functionally useful, and the ledge neatly solves the problem of battens meeting the wall at the top.
The one genuine insight I’d share: precision during layout pays off exponentially during installation. I’ve never regretted spending an extra 30 minutes marking batten positions with a level and a pencil. Once those marks are right, the rest follows. Have you tackled any wall projects yourself, or is board and batten on your radar for the first time?
Conclusion
Board and batten remains one of the most versatile ways to introduce texture and architectural detail into a home. The range of styles—from a simple half-wall ledge to modern geometric patterns—means there’s a version that fits your room, your budget, and your design comfort level. Standard spacing, accessible materials, and manageable installation make it approachable for DIY. Whether you’re drawn to the classic elegance of picture-frame molding for a bedroom or functional mudroom hooks for an entryway, board and batten delivers impact without requiring professional skill or deep pockets.
Start with one accent wall using the standard 1×4 setup if you’re new to the technique. Invest time in layout and finishing work rather than rushing installation. Paint choice matters, but shadows matter more—let the battens’ geometry do some of the visual work. And if you’re hesitant about commitment, remember that most board and batten installations can be removed and the wall repaired, so the risk is lower than you might assume. Your blank wall is waiting for depth and character. Board and batten delivers both.
References
The Spruce. (2024). 15 Board and Batten Accent Walls That Will Instantly Add Texture to Any Room. https://www.thespruce.com/board-and-batten-wall-ideas-8635270
Delineate Your Dwelling. (2024). Board and Batten Accent Wall Ideas. https://www.delineateyourdwelling.com/board-and-batten-accent-wall-ideas/
Home Depot. (2024). How to Make a Board and Batten Wall Accent. https://www.homedepot.com/c/ah/how-to-make-a-board-and-batten-wall-accent/9ba683603be9fa5395fab90118469a03
Anika’s DIY Life. (2024). 45 Board and Batten Wall Ideas for Your Home. https://www.anikasdiylife.com/board-and-batten-wall-ideas/
Sarah Anderson . J
I’m the mom behind Wise Mom Blogger, where everyday creativity meets real-life motherhood. I share easy DIY crafts, cozy knitting and crochet projects, beginner-friendly sewing ideas, and family-tested recipes—plus quick baking hacks that make homemade feel doable on busy days.