Have you ever walked into your kitchen and smelled fresh, warm biscuits baking in the oven? It’s one of the best smells in the world! I remember the first time I made biscuits from scratch. I was a little nervous, but once I learned the simple steps, I couldn’t believe how easy it was. Today, I’m going to share everything I learned about making perfect, fluffy biscuits at home. Trust me, if I can do it, you can too!
Why Make Biscuits at Home?
Before we jump into the recipe, let me tell you why I love making biscuits at home instead of buying them from the store. First, homemade biscuits taste a million times better. They’re warm, buttery, and melt in your mouth. Second, you know exactly what goes into them – no weird ingredients you can’t pronounce. Third, it’s actually really fun! There’s something special about making food with your own hands.
What Makes a Perfect Biscuit?
I learned from watching baking videos that a perfect biscuit needs to have four important qualities. According to the experts at Allrecipes, your biscuits should be:
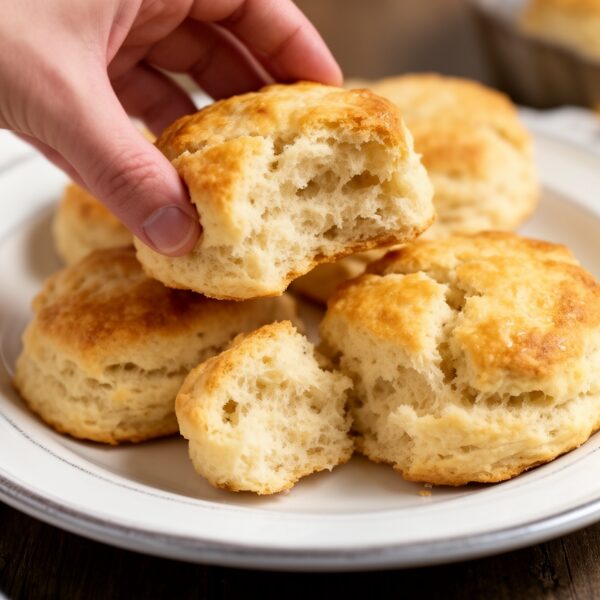
The Four Must-Haves:
- Soft and Flaky – They should break apart in layers
- Tender Yet Sturdy – Not crumbly or falling apart
- Buttery and Moist – Never dry!
- Tall and Risen – They should puff up beautifully
Once I understood these four things, everything made sense. Every step I take when making biscuits helps achieve one of these goals.
What You’ll Need
Ingredients
Here’s the great news – you only need a few simple ingredients that you probably already have in your kitchen!
| Ingredient | Amount | Why We Need It |
|---|---|---|
| All-purpose flour | 2 cups | The base of our biscuits |
| Baking powder | 2 teaspoons | Helps them rise and get fluffy |
| Baking soda | ¼ teaspoon | Works with buttermilk to make them tender |
| Salt | 1 teaspoon | Adds flavor |
| Cold butter | ½ cup (1 stick) | Makes them flaky and delicious |
| Buttermilk | ¾ to 1 cup | Makes them moist and tender |
Tools You’ll Need
- Large mixing bowl
- Box grater (for the butter)
- Fork or whisk
- Measuring cups and spoons
- Biscuit cutter (or a drinking glass)
- Baking sheet or cast iron skillet
- Parchment paper (optional)
Step-by-Step Instructions
Step 1: Get Everything Cold
This is my number one tip! Before you even start, put your butter in the freezer for about 30 minutes. Some people even keep their flour in the freezer. Why? Because cold ingredients are the secret to flaky biscuits. When cold butter hits the hot oven, it creates steam, and that steam makes beautiful flaky layers.
Step 2: Preheat Your Oven
Turn your oven to 425-450 degrees Fahrenheit. You want it super hot and ready to go before your biscuits are done. This high heat helps them rise quickly and get that golden-brown top.
Step 3: Measure Your Flour Correctly
Here’s something I didn’t know when I first started – there’s a right way to measure flour! Don’t scoop your measuring cup directly into the flour bag. That packs it down too much, and you’ll end up with dry biscuits. Instead:
- Use a spoon to scoop flour into your measuring cup
- Fill it up until it’s a little over the top
- Use a knife to level it off
This simple trick changed my biscuit game completely!
Step 4: Mix the Dry Ingredients
In your big mixing bowl, add:
- 2 cups of flour (measured the right way!)
- 2 teaspoons of baking powder
- ¼ teaspoon of baking soda
- 1 teaspoon of salt
Give everything a good whisk so it’s all mixed together evenly.
Step 5: Grate the Frozen Butter
This is my favorite part! Take your frozen butter stick and use a box grater to grate it into pieces. I learned this trick from a video by Mae, and it works so much better than cutting butter into chunks. The grated butter mixes into the flour more easily and stays colder longer.
Once you’ve grated all the butter, you can put the bowl back in the freezer for 3-5 minutes if you want to be extra careful about keeping it cold.
Step 6: Cut the Butter Into the Flour
Now, add your grated butter to the flour mixture. Using a fork, gently press and mix the butter into the flour. This is called “cutting in” the butter. You want it to look like coarse crumbs or sand. The mixture should look crumbly, not smooth. This takes about 2-3 minutes.
Step 7: Add the Buttermilk
Make a well (like a little bowl) in the center of your flour mixture. Start pouring in your buttermilk a little at a time. I usually start with ¾ cup. Use your fork to gently stir the flour into the buttermilk.
Important tip: Don’t stir too much! This is probably the biggest mistake people make. The more you stir, the tougher your biscuits will be. Just mix until the dough barely comes together. It will look a little messy and shaggy – that’s perfect!
Step 8: Knead the Dough Gently
Sprinkle a little flour on a clean counter or cutting board. Dump your dough out onto the surface. Flour your hands, too, so the dough doesn’t stick.
Now, here’s the fun part – you’re going to fold and press the dough. But remember, be gentle! Here’s what I do:
- Pat the dough into a rectangle about ½ to ¾ inch thick
- Fold it in thirds (like folding a letter)
- Turn it a quarter turn
- Pat it out again
- Repeat this folding process 3-4 more times
This folding creates those beautiful flaky layers. Each fold makes a layer! Just don’t do it too many times, or you’ll overwork the dough.
Step 9: Cut Out Your Biscuits
After your last fold, pat the dough out one final time to about ¾ inch thick. Don’t make it too thin, or your biscuits won’t be tall!
Dip your biscuit cutter in flour (this stops it from sticking). Press straight down through the dough – no twisting! Twisting seals the edges and stops your biscuits from rising properly. Just push straight down and lift straight up.
You should get about 8-10 biscuits, depending on your cutter size. Don’t throw away the scraps! Gently push them together and cut out a few more biscuits.
Step 10: Arrange and Bake
Place your biscuits on a baking sheet lined with parchment paper, or even better – in a cast iron skillet! Here’s a secret: put them close together so they’re just touching. They need something to lean on as they rise, so they’ll grow up tall instead of spreading out wide.
You can brush the tops with a little extra buttermilk or melted butter for extra flavor and color.
Bake for 13-15 minutes at 425-450 degrees. Watch them carefully! They’re done when the tops are golden brown. Don’t overbake them, or they’ll be dry.
Step 11: The Best Part – Butter Them!
As soon as your biscuits come out of the oven, brush the tops with melted butter. This makes them shiny, golden, and extra delicious. Wrap them in a clean towel to keep them warm.
Common Mistakes to Avoid
Here’s what NOT to do:
- Don’t use warm butter (it won’t make flaky layers)
- Don’t overmix the dough (makes tough biscuits)
- Don’t twist your biscuit cutter (stops them from rising)
- Don’t skip the folding steps (you’ll miss the flaky layers)
- Don’t overbake (causes dry, crumbly biscuits)
- Don’t add too much flour (measure correctly!)
Ways to Enjoy Your Biscuits
Now that you’ve made perfect biscuits, what should you do with them? Here are my favorite ways to eat them:
- With butter and honey
- With jam or jelly
- With gravy for breakfast
- As a sandwich with eggs and bacon
- With fried chicken
- With butter and syrup
- Just plain and warm!
My Final Tips
Making biscuits is all about practice. My first batch wasn’t perfect, and that’s okay! Each time you make them, you’ll get better. Pay attention to how the dough feels – it should be soft but not sticky.
Remember the golden rule: be gentle and work quickly. Cold ingredients + gentle handling + hot oven = perfect biscuits!
Why This Recipe Works
Everything in this recipe has a purpose. The cold butter creates steam pockets that make flaky layers. The buttermilk reacts with the baking soda to make the biscuits tender. The high oven temperature makes them rise quickly. The folding technique creates layers. And working gently keeps them from getting tough.
When you understand why you’re doing each step, it’s easier to remember and get it right!
Conclusion
There you have it – everything I know about making biscuits at home! It might seem like a lot of steps at first, but once you do it a couple times, it becomes second nature. The smell of fresh biscuits baking in your oven is worth every minute of effort.
I hope you try this recipe and share it with your family. There’s something really special about serving food you made yourself. Plus, people will think you’re an amazing cook!
So grab your mixing bowl, get that butter cold, and let’s make some biscuits. You’ve got this!
Video Resources Used:
Sarah Anderson . J
I’m the mom behind Wise Mom Blogger, where everyday creativity meets real-life motherhood. I share easy DIY crafts, cozy knitting and crochet projects, beginner-friendly sewing ideas, and family-tested recipes—plus quick baking hacks that make homemade feel doable on busy days.
