Last updated: January 15, 2026
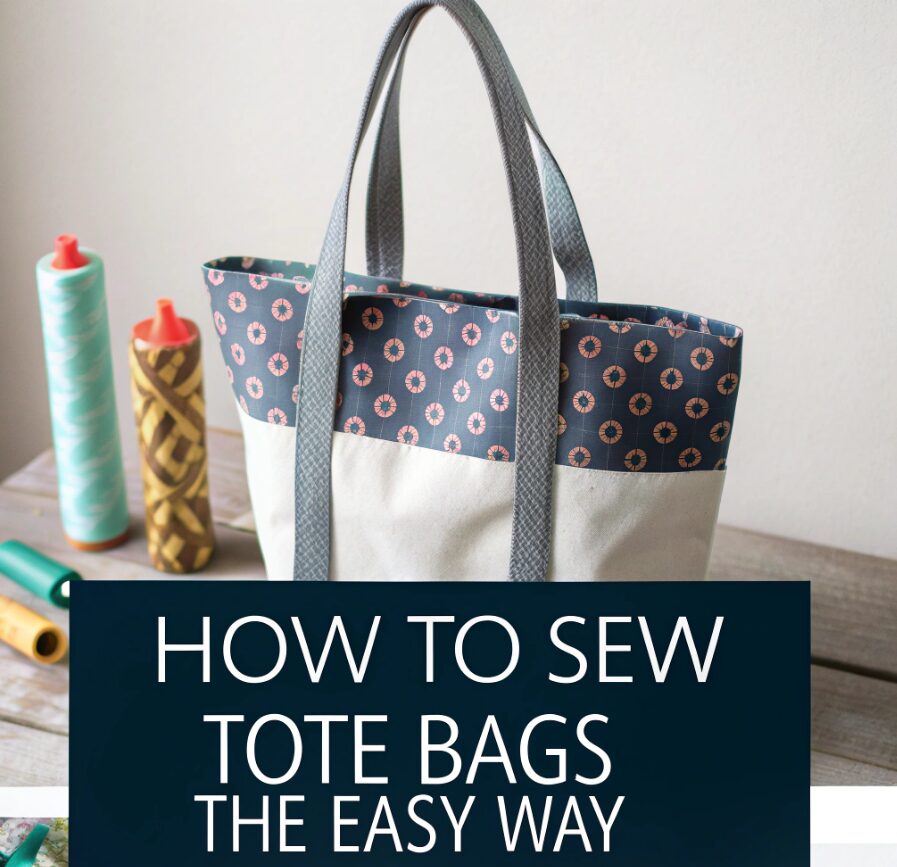
Learning how to sew a reusable tote bag for beginners is one of the most rewarding first sewing projects you can tackle. This simple project requires basic materials, takes about 2-3 hours to complete, and gives you a practical item you’ll use for years. Whether you’re completely new to sewing or just want to create eco-friendly shopping bags, this guide walks you through every step with clear instructions and helpful tips.
Key Takeaways
- Simple project: A basic tote bag requires only fabric, thread, and basic sewing skills
- Quick completion: Most beginners can finish their first tote bag in 2-3 hours
- Minimal supplies: You only need fabric, thread, scissors, pins, and a sewing machine (or needle for hand sewing)
- Customizable design: Start with basic dimensions and add your own style touches
- Practical outcome: Creates a sturdy, washable bag perfect for shopping or daily use
What Materials Do You Need for a Beginner Tote Bag?
You need just five basic materials to sew your first reusable tote bag: fabric, thread, scissors, pins, and either a sewing machine or needle for hand sewing.
Here’s your complete supply list:
Essential Materials:
- Fabric: 1/2 yard of medium-weight cotton, canvas, or denim
- Thread: All-purpose polyester thread in matching or contrasting color
- Scissors: Sharp fabric scissors (not paper scissors)
- Pins: Straight pins or safety pins
- Measuring tool: Ruler or measuring tape
Sewing Tools (choose one):
- Sewing machine (any basic model works)
- Hand sewing needle (size 16-18 for thicker fabrics)
Optional but helpful:
- Iron and ironing board
- Seam ripper (for fixing mistakes)
- Fabric marker or chalk
Fabric choice matters for beginners. Cotton canvas or heavy cotton works best because it’s forgiving, doesn’t fray easily, and creates a sturdy bag. Avoid stretchy fabrics like jersey or slippery materials like satin for your first project.
How to Cut Your Fabric for a Basic Tote Bag
Cut two rectangles measuring 15 inches wide by 16 inches tall for the bag body, plus two strips measuring 3 inches wide by 20 inches long for the handles.
Step-by-step cutting process:
- Wash and iron your fabric first to prevent shrinking later
- Lay fabric flat on a clean, large surface
- Measure and mark your pieces with fabric chalk:
- 2 rectangles: 15″ × 16″ (bag front and back)
- 2 strips: 3″ × 20″ (handles)
- Cut carefully along your marked lines
- Double-check measurements before moving to the next step
Pro tip for beginners: Add an extra 1/4 inch to all measurements if you’re nervous about cutting. You can always trim excess fabric, but you can’t add it back.
The 15″ × 16″ dimensions create a practical everyday tote that’s not too big for beginners to handle but large enough to be useful. The 20-inch handles provide comfortable shoulder carry length.
What’s the Best Way to Prepare Your Fabric Pieces?
Press all fabric pieces with an iron and mark your seam allowances before you start sewing to ensure clean, professional-looking results.
Preparation steps:
- Iron all pieces flat to remove wrinkles and creases
- Mark 1/2-inch seam allowances on the wrong side of fabric with chalk
- Check fabric grain – make sure all pieces are cut on the same grain direction
- Organize your workspace with good lighting and enough room to maneuver
Handle preparation:
- Fold each handle strip in half lengthwise
- Press the fold with an iron
- This creates a center guideline for even sewing
Common beginner mistake: Skipping the ironing step. Wrinkled fabric leads to uneven seams and a less professional finish. Take the extra 5 minutes to press everything smooth.
How to Sew the Tote Bag Body for Beginners
Place the two main fabric pieces right sides together, pin along three edges (leaving the top open), and sew with a 1/2-inch seam allowance.
Detailed sewing steps:
- Place fabric pieces right sides together (the “good” sides facing each other)
- Pin three edges: both sides and the bottom, leaving the top completely open
- Start sewing at one top corner using a 1/2-inch seam allowance
- Sew down the side, across the bottom, and up the other side in one continuous line
- Backstitch at the beginning and end to secure your seams
- Remove pins as you sew (don’t sew over them)
Machine settings for beginners:
- Use a straight stitch
- Set stitch length to 2.5-3mm
- Medium tension setting
- Go slowly and steady
Hand sewing option: Use a running stitch or backstitch, keeping stitches small and even (about 8-10 stitches per inch). Hand sewing takes longer but gives you more control.
Quality check: Your seams should be straight and consistent. If you notice wobbles, that’s normal for your first project – they’ll improve with practice.
How to Create Strong, Comfortable Handles
Fold each handle strip in half lengthwise, sew along the long edge with a 1/4-inch seam allowance, then turn right side out for a clean finish.
Handle construction process:
- Fold each 3″ × 20″ strip in half lengthwise with right sides together
- Pin along the long edge only (leave short ends open)
- Sew with 1/4-inch seam allowance along the pinned edge
- Turn handles right side out using a safety pin or turning tool
- Push out corners and press flat with an iron
Turning technique for beginners:
- Attach a safety pin to one end of the handle
- Push the pin through the tube and work it along to turn the handle right side out
- This method prevents fabric from getting stuck inside
Handle strength tip: For extra durability, topstitch along both long edges of each handle after turning. This adds strength and a professional appearance.
Where to Attach Handles for Best Functionality
Position handles 3 inches from each side seam and 2 inches down from the top edge of your tote bag for optimal weight distribution and comfort.
Handle placement guide:
- Turn bag right side out and press seams
- Measure 3 inches from each side seam along the top edge
- Mark handle positions with chalk or pins
- Place handle ends 2 inches down from the top edge
- Pin handles in place before sewing
Attachment method:
- Position each handle end so it overlaps the bag by 2 inches
- Pin securely in place
- Sew a rectangle pattern: stitch around the perimeter of each handle end
- Add an X pattern inside the rectangle for extra strength
Testing handle placement: Before sewing permanently, hold the bag by the handles to check if they feel comfortable and balanced. Adjust position if needed.
How to Finish the Top Edge of Your Tote Bag
Create a clean hem by folding the top edge down 1/2 inch, then folding again 1 1/2 inches, and sewing close to the inner fold line.
Professional hem technique:
- Fold top edge down 1/2 inch and press with iron
- Fold down again 1 1/2 inches and press to create a double-fold hem
- Pin hem in place all around the top opening
- Sew close to the inner fold using a straight stitch
- Remove pins and press for a crisp finish
Why double-fold matters: This technique hides raw edges completely and creates a sturdy top edge that won’t fray with use. It also adds structure to the bag opening.
Sewing the hem with handles attached: Go slowly when sewing over handle areas. The extra fabric layers require patience, and you might need to use your machine’s hand wheel to work through thick spots.
What Common Mistakes Should Beginners Avoid?
The most common beginner mistakes include cutting fabric incorrectly, sewing with inconsistent seam allowances, and rushing through the pressing steps.
Top mistakes and solutions:
Cutting errors:
- Mistake: Using dull scissors or cutting on carpet/soft surfaces
- Solution: Use sharp fabric scissors on a hard, flat surface
Seam allowance problems:
- Mistake: Varying seam widths throughout the project
- Solution: Mark your seam allowance and use your machine’s seam guides
Skipping pressing:
- Mistake: Not ironing seams and hems
- Solution: Press after each major step for professional results
Handle attachment issues:
- Mistake: Attaching handles unevenly or too close to edges
- Solution: Measure twice, mark clearly, and test placement before sewing
Thread tension troubles:
- Mistake: Using wrong tension settings causing loose or puckered seams
- Solution: Test on fabric scraps first and adjust as needed
How to Add Personal Style to Your Basic Tote
Once you’ve mastered the basic construction, customize your tote bag with decorative stitching, fabric paint, patches, or contrasting trim for a unique look.
Easy customization ideas:
Decorative elements:
- Iron-on patches or appliqués
- Fabric paint designs (use fabric-specific paint)
- Embroidery or decorative stitching
- Contrasting binding on edges
Functional additions:
- Interior pocket (sew a smaller rectangle inside)
- Magnetic snap closure
- Key clip or carabiner attachment point
- Reinforced bottom with cardboard insert
Color and pattern options:
- Use contrasting thread for visible topstitching
- Mix two coordinating fabrics for front and back
- Add ribbon or trim along the top hem
- Create a reversible bag with different fabrics
Start simple for your first bag. Master the basic construction before adding complex decorative elements. Each additional feature is a new skill to learn.
How Long Does It Take to Complete Your First Tote Bag?
Most beginners can complete their first reusable tote bag in 2-3 hours, including cutting time, with hand sewing taking about twice as long as machine sewing.
Time breakdown by method:
Machine sewing timeline:
- Cutting and prep: 30 minutes
- Sewing bag body: 20 minutes
- Making handles: 30 minutes
- Attaching handles and finishing: 45 minutes
- Total: 2-2.5 hours
Hand sewing timeline:
- Cutting and prep: 30 minutes
- Hand sewing bag body: 1.5 hours
- Making handles: 45 minutes
- Attaching handles and finishing: 1 hour
- Total: 3.5-4 hours
Factors that affect timing:
- Your comfort level with tools
- Whether you stop to fix mistakes
- How much pressing and measuring you do
- Decorative elements you choose to add
Don’t rush your first project. Taking time to measure, pin, and press properly creates better results and actually saves time by preventing mistakes.
Frequently Asked Questions
Can I make a tote bag without a sewing machine? Yes, you can hand sew a tote bag using a running stitch or backstitch. It takes longer but gives you more control over each stitch. Use a thimble to protect your finger and choose a sturdy needle.
What’s the best fabric for a beginner’s first tote bag? Medium-weight cotton canvas or heavy cotton works best. These fabrics are forgiving, don’t stretch or slip while sewing, and create a sturdy finished bag that holds its shape well.
How much fabric do I need for one tote bag? You need 1/2 yard of fabric for a basic 15″ × 16″ tote bag with handles. Buy a little extra if you want to add pockets or decorative elements.
Can I wash my homemade tote bag? Yes, cotton and canvas tote bags are machine washable. Wash in cold water and air dry to prevent shrinking. Press with an iron if needed to restore shape.
What if my seams are crooked? Crooked seams are normal for beginners and don’t affect the bag’s function. For your next project, go slower and use your machine’s seam guide. You can also mark seam lines with chalk before sewing.
How do I make my bag stronger for heavy items? Use heavier fabric like canvas or denim, double-stitch all seams, and add interfacing to the bottom panel. You can also create a boxed bottom by sewing across the bottom corners.
What size should I make my first tote bag? The 15″ × 16″ size recommended in this guide is perfect for beginners. It’s large enough to be useful but not so big that it becomes unwieldy to sew or use.
Can I make the handles longer or shorter? Yes, adjust handle length based on how you want to carry the bag. 20 inches works for shoulder carry, while 14-16 inches is better for hand carry only.
What thread should I use? All-purpose polyester thread works for most fabrics. Choose a color that matches your fabric or use contrasting thread as a design element. Avoid cheap thread that breaks easily.
How do I fix a mistake in my sewing? Use a seam ripper to carefully remove incorrect stitches. Go slowly to avoid tearing the fabric. Most beginner mistakes can be fixed by re-sewing the affected area.
Should I pre-wash my fabric? Yes, always pre-wash cotton and canvas fabrics to prevent shrinking after you’ve completed your bag. Wash in the same temperature you’ll use for the finished bag.
Can I add a lining to my tote bag? Yes, but save this for your second or third project. Lining adds complexity and requires additional skills. Master the basic construction first.
Key Takeaways
- Start with quality materials: Medium-weight cotton or canvas fabric and sharp scissors make the biggest difference in your results
- Measure twice, cut once: Accurate cutting and consistent seam allowances create professional-looking results
- Press at every step: Ironing seams and hems as you go creates crisp, clean lines that elevate your finished bag
- Take your time with handles: Proper handle placement and secure attachment ensure your bag will hold up to regular use
- Practice makes perfect: Your first tote bag teaches you fundamental skills you’ll use in every future sewing project
- Hand sewing is totally valid: You don’t need a machine to create a beautiful, functional tote bag
- Customization comes later: Master the basic construction before adding decorative elements or complex features
- Mistakes are learning opportunities: Every crooked seam or imperfect corner teaches you something for your next project
- Function matters most: A slightly imperfect but well-constructed bag that you’ll actually use is better than a perfect bag that sits unused
Conclusion
Sewing your first reusable tote bag is more than just creating a useful item – it’s building confidence in your ability to make practical things with your own hands. The skills you learn in this project, from cutting fabric accurately to sewing straight seams, form the foundation for countless future sewing adventures.
Your first bag might not be perfect, and that’s completely normal. Focus on completing each step carefully rather than achieving perfection. Every experienced seamstress started with a first project that had crooked seams or uneven handles.
Ready to start your next sewing project? Try making a second tote bag in a different fabric or color. You’ll be amazed at how much easier and faster the process becomes with just one project under your belt. Consider adding a simple interior pocket or trying a contrasting handle fabric to build your skills gradually.
The best part about learning how to sew a reusable tote bag for beginners is that you end up with something genuinely useful. Every time you carry groceries or books in your handmade bag, you’ll remember the satisfaction of creating something practical and beautiful with your own hands.
SEO Meta Title: How to Sew a Reusable Tote Bag: Beginner’s Guide 2026
Sarah Anderson . J
I’m the mom behind Wise Mom Blogger, where everyday creativity meets real-life motherhood. I share easy DIY crafts, cozy knitting and crochet projects, beginner-friendly sewing ideas, and family-tested recipes—plus quick baking hacks that make homemade feel doable on busy days.